Visar inlägg med etikett stm32 E407. Visa alla inlägg

måndag 10 augusti 2015

Clock setup for Olimex E407 using STM32CubeMX

Recently I got a reason to dig up my old Olimex E407 board and the RS232 shield I made for it (see earlier posts on this blog). This time though, I'm using Keil in Windows together with a ST Link V2. Getting the clocks and pll's right isn't an easy task, and certainly not a fun one, so I decided to give CubeMX and ST's HAL libraries a try.

The STM32CubeMX program (download it from ST.com) is a fairly new invention, and the libraries leave a lot to whish for still, so you should be careful with it. The libraries are still ful of bugs, but they are also getting a lot better rapidly.

Ok, first of course, download and install STM32CubeMX. If you want to launch it from Keil uVision, add the path to CubeMX to the system path environment variable. The start uVision5 and create a project for an STM407ZG.


Start CubeMX by clicking the "play" button right of the STM32Cube Framework (API).

Now, the Olimex E407 board is equipped with a 12 MHz external crystal clock and a 32.768 kHz external RTC crystal, so we have to enable those pins first.


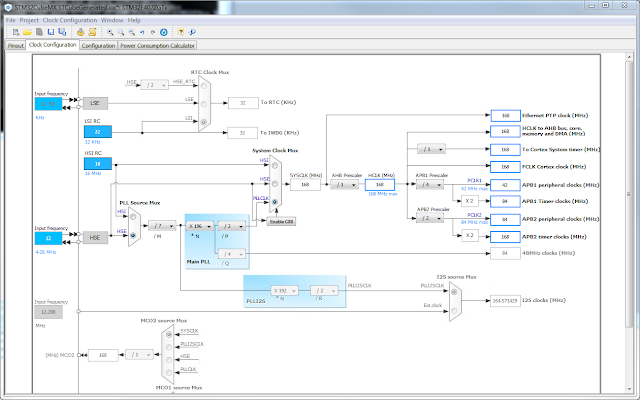
Switch to the "Clock Configuration" tab and input 12 MHz as HSE input frequency and then make the following selections:
  1. Select HSE as PLL Soure Mux
  2. Set the /M divider to /7
  3. Set the *N multiplier to x196
  4. Set the /P divider to /2
  5. Select PLLSLK as System Clock Mux
  6. Set APB1 Prescaler to /4
  7. Set APB2 Prescaler to /2


Save it and select "Generate Code" from the Project menu.

When done, choose to close the CubeMX project and update the settings in uVision5.

A main.c file is generated for you that uses these new settings , ready to be filled in with your applicaiton source.

Good Luck

lördag 15 september 2012

Building the GCC tool chain for the STM32F4

So... I have to develop some applications on bare metal arm processors and need to practice a bit on a development board before I get started with the customer. The applications will be written in C, but I also want to investigate how C++ fits a project like this. The program is an audio application which eventually will use some filtering and asynchrounous USB transfer.

I have chosen an Olimex Board (STM32-E407) since it conforms to the Arduino form factor and has a processor close to the model used by my custormer. A JTAG was and a couple of development shields were ordered as well.

Before I can get started I need a toolchain to compile my applications. I could download a prebuilt toolchain from Mentor Graphics (Code Sourcery), but I wanted to see how if I could build one myself.

I have a 32 bit Ubuntu 12.04 host, and I tried to follow two other howto’s but none of them worked, so I had to mix the instructions from both. (http://www.triplespark.net/elec/pdev/arm/stm32.html, http://jeremyherbert.net/get/stm32f4_getting_started )

First install the tools needed for building the toolchain:
$sudo apt-get install flex bison libgmp3-dev libmpfr-dev libncurses5-dev libmpc-dev autoconf texinfo build-essential libftdi-dev libzip-dev

Now clone the source repository:

Note: See the update below for instructions for GDB XML support!
$git clone git://github.com/esden/summon-arm-toolchain
$cd summon-arm-toolchain


Since noone else will use my toolchain I will install the toolchain in my home directory: ~/tools/arm/arm-linaro-eabi-4.6.

Build the tool chain:
$./summon-arm-toolchain PREFIX=~/tools/arm/arm-linaro-eabi-4.6/ OOCD_EN=1 TARGET=arm-none-eabi LIBSTM32_EN=1 USE_LINARO=1 CPUS=2

When done, check the result:
$/bin/arm-none-eabi-gcc --version

It should say something like this:
arm-none-eabi-gcc (Linaro GCC 4.6-2011.10) 4.6.2 20111004 (prerelease)
Copyright (C) 2011 Free Software Foundation, Inc.
This is free software; see the source for copying conditions.  There is NO
warranty; not even for MERCHANTABILITY or FITNESS FOR A PARTICULAR PURPOSE.


To be able to work efficiently on the command line I create an environment setup script. With this script I can have several different toolchains for different platforms, and different automation scripts, that doesn't pollute my systems PATH environment variables and bash setup. 


Open up a text editor and create the file env.sh, looking like this:

#!/bin/sh
echo "Olimex STM32-E407 Development Environment"

(
#Sub shell
#Export the variables to use in the development environment
export PATH=~/tools/arm/arm-linaro-eabi-4.6/bin:$PATH
export PS1="[Olimex E407] \u@\h:\w\$ "

#Start a new shell with the exported variables
/bin/sh
)


Change the mode of the file:
$chmod +x env.sh

Enter your environment:
$./env.sh

To exit the environment shell, just type exit and you’ll be back to your normal prompt.

From here I followed the last sections in http://jeremyherbert.net/get/stm32f4_getting_started to build the first test software.


Good luck!

Update Sept. 17 2012
To be able to debug the target I hade to rebuild the toolchain with XML support enabled in the GDB target.

To do this you first need to install expat:
$sudo apt-get install libexpat1 libexpat1-dev

Then find the GDB build target in the automated build script named summon-arm-toolchain and add the parameter "--with-expat \" before the GDBFLAGS parameter (or add it to the GDBFLAGS variable).

Now build the tool chain according to the instructions above.

fredag 14 september 2012

Setting up Olimex arm-usb-tiny-h with Ubuntu 12.04

Along with the Olimex E407 board, I also ordered an Olimex arm usb tiny h JTAG to be able to program the board. I am more convenient with working in Linux than other operating systems so I really wanted this to work with my Ubuntu 12.04 (32bit x86) installation.

This was a bit tricky, and it has taken some time to Google for all the bits and pieces that finally made it work.

First I downloaded libftdi 0.20 from here: http://www.intra2net.com/en/developer/libftdi/download.php
Build it with the normal series of auto tools commands:


$./configure
$make
$sudo make install


I am not sure if both are needed, but to be on the safe side I downloaded the ftd2xx driver and installed it as well. You can get it here: http://www.ftdichip.com/Drivers/D2XX.htm. Copy the libftd2xx.so.1.1.12 and libftd2xx.a to /usr/local/lib and make symlinks with the names libftd2xx.so and libftd2xx.so.1

I downloaded and compiled openOCD 0.6.0 from here http://openocd.sourceforge.net/ and build it with:

Note: See updated instruction regarding patch below!
$./configure --enable-ftdi --enable-ft2232_ftd2xx

$make
$make install

When plugging in the arm-usb-tiny-h, you will not be granted access by default. To handle this you have to create a rule for udev:

$cd /etc/udev/rules.d

As root, create a file named 99-olimex-arm-usb-tiny-h.rule with this content:

SUBSYSTEMS=="usb", ATTRS{idVendor}=="15ba", ATTRS{idProduct}=="002a", MODE="0666"

I also removed the brltty package which might interfere with some of the ftdi drivers, but this was only a precaution. You could try running without removing it.

$sudo apt-get remove brltty

Now I run openOCD with the following command (paths relative from where I built openOCD):

$openOCD -f tcl/interfaces/ftdi/olimex-arm-usb-tiny-h.cfg -f stm32f4x.cfg

You can download the stm32f4x.cfg from Olimex web site.

Good luck!

Update Sept 17 2012
Apply the patch provided by this site: http://pastebin.com/rdFF2eZd before configuring and buildng openOCD